Trading Notes for Trading Case XR1
Overview
Learning Objectives
Currency futures and currency options; option trading strategies; delta hedging; currency option pricing models.
You are required to use a real world option support system to construct trading strategies and manage the risk of a position.
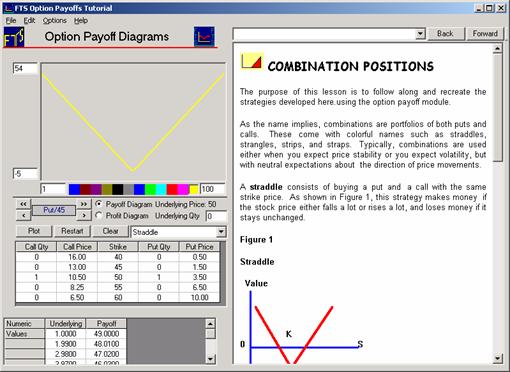
In this trading exercise the underlying price process is a Brownian motion process with stochastic jumps. The size and duration of the jump is random but traders know that at least one jump is realized every trial. Under these circumstances you may want to try out an option trading strategy such as the straddle. The straddle is a strategy that can be employed if you think volatility is going to increase but you cannot predict the direction of the trend. In the module described next you can try out different option trading strategies and see how they relate to different views of the market.
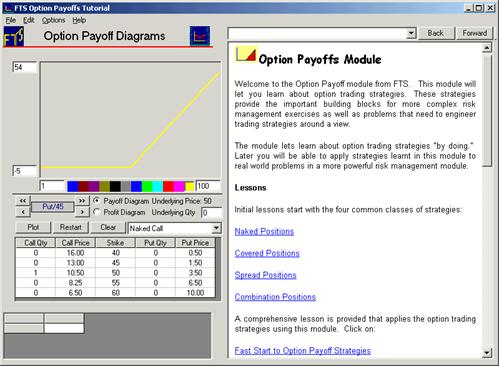
FTS traders are price takers in the option market but know that a jump will take place. As a result, ex ante it can be profitable to use straddle type trading strategies. You should consult the Option Payoff Module on the Virtual Classroom to see how the straddle works (as well as the other pre-programmed strategies in this module). This module appears as follows (to see the lessons click on Help, and then click on Modules Specific Help to bring up the material in the right hand side of the screen).
The drop down menu beside "Naked Call" lets you choose various types of Option Trading Strategies to see how they are formed (see Call Qty and or Put Qty in the grid after selecting a strategy). For example, see the Combinations section below and Straddle is selected from the drop down:
However, there is an additional twist in the trading exercise XR1. The strike prices for the options remain fixed throughout the trading period. This implies that once a jump is realized one type of option can become deep out of the money. As a result, traders face the following question. How can another straddle type of strategy be implemented?
The answer to this is to create an actual position using both the options and the futures market to replicate the long straddle. This position will finish in the money if a significant jump occurs before the end of the period.
Historical Note re Barings:
Nick Leeson's trading activities on the Japanese and Singapore futures exchanges led to the downfall of Barings. Basically Leeson was short the straddle constructed from options and futures and then further built up his position after the Kobe earthquake of January 17, 1995. Being short the straddle he was in the opposite direction to the Nikkei as it was falling.
Before the earthquake, Nikkei traded in a narrow range of around 19,000 to 19,500. If your view was that this would persist (as Leeson's was) you can check using the Option Payoff Module whether short the straddle is desirable or not (aside to convert a long position to a short position use the Options menu item in this module).
Among Leeson's holdings he had a long futures positions of approximately 3,000 contracts on the Osaka Stock Exchange. But after the earthquake he bought aggressively reaching nearly 20,000 contracts within a few weeks later. Also amazingly by the time everything was over he had sold around 70,000 Nikkei put and call options with a nominal value of nearly $7 bn.
XR1 Trading versus Real World
In XR1 unlike the real world, you can exploit unlimited liquidity and no capital constraints. In the real world Barings collapsed when it could not meet it's trading obligations. On February 27, 1995, Barings went into receivership and had huge outstanding futures positions in various Japanese equity and interest rate markets (approximately US$27 billion and about US$7 bn of this was on the Nikkei 225 equity contract, the remaining in bonds and euro yen contracts. The size of Barings positions is remarkable when you consider the bank's reported capital was around $615 million!
As a result, in XR1 you can try to exploit the unlimited liquidity and unlimited capital. Now you can try and do what Leeson tried, but was unable to do in the real world markets --- trade out of any problem by using a "doubling up strategy." That is, bet on a certain price change and keeping increasing the bet until it is realized. This is actually an arbitrage opportunity that is available in the Black Scholes perfect market Brownian motion world if there is perfect liquidity. (It is actually assumed away by imposing technical assumptions (identified subsequent to the original paper) to eliminate the possible implementation of the doubling up strategy. In XR1, however, you are trading in a discrete Brownian Motion world and can attempt to exploit liquidity and no borrowing constraints --- the only risk faced is the the finite number of price changes which reduces as the trading period continues.
As a final note, the case draws an important distinction between trading in a relatively perfect market environment versus the important real world constraints such as liquidity and margin calls. Liquidity and margins resulted in the downfall of not only Leeson but later by the Long Term Capital Management Fund (LTCM) who also took large and highly leveraged positions.
As a result, XR1 is designed to draw your attentions to the role of market imperfections in the real world one of which is that there is not perfect liquidity.
Delta Hedging
A second important element to XR1 is to experience how to manage the delta of a position. To read about delta click on Option Lessons and then select and read What is Delta? This will acquaint you with managing a delta neutral or delta aggressive position. For example, if you want to make your position very sensitive to changes in the Exchange rate you can trade to increase delta a lot. A large positive delta implies that if the exchange rate strengthens then your position increases in value. A large negative delta implies the opposite (i.e., you gain when the exchange rate weakens) and a delta neutral position (i.e., position delta equals to 0) implies that your position is relatively insensitive to exchange rate fluctuations. That is, it is hedged against exchange rate fluctuations.
By using delta to hedge reduces the number of securities you have to purchase for hedging purposes when compared to a static hedge (i.e., hedge and forget) but the cost associated with the dynamic hedge is that you must constantly monitor and alter the number of units you are hedging with. This is because position delta will changes over time as the underlying exchange rate changes. XR1 is designed to introduce you to this concept of delta hedging and lets you monitor your position delta whilst trading.
Again there is a major implementation difference between delta hedging in the perfect market world (perfect liquidity and zero transaction costs) and delta hedging in the real world. In XR1 you get to experience it in a relatively perfect market world. In the real world you have to further take into account that each time you adjust your position you will incur trading costs. As a result, in the real world you may also want to pay attention to your position gamma which provides some control over the relative frequency and size of your delta adjustments. That is, a position that is delta and gamma neutral is predicted to require less adjustments than is the case for a position that is only delta neutral.
Again, XR1 provides a trading exercise where you can try out and learn how to apply the "option Greeks" when managing exchange rate risk. For additional finer points you are encouraged to consult the option lessons (hyperlink is provided above).
Appendix 1
Trading Tips for Trading XR1
In trading case XR1 you are a short term “news trader.” You have information that lets you form a “market view” about the short term price behavior of the underlying exchange rate. In XR1 the price of the underlying exchange follows the geometric Brownian motion process assumed by Black and Scholes with one important difference. During the trading period at least one significant economic news event will occur that will result in the price of the exchange rate taking a jump. However, you do not know when the jump will take place or it’s magnitude and direction. In addition, there may be more than one significant jump (but there will be at least one). Unlike the real world you do not face any liquidity or capital constraints.
You have an initial position in an option that you cannot trade, but you can trade the remaining derivatives (option and futures). As a result, your task is to manage your trading strategy so that it makes money if your view of the market is correct. At any time if you want to lock in your trading gains you can also manage the delta of your position. By linking to the XR1 support spreadsheet (you can download this from the Virtual Classroom page immediately below where you download the FTS Trader from).
Why Delta?
Delta is a measure of the dollar sensitivity of your position to changes in the underlying (i.e., the exchange rate). Formally, the delta of a derivative security is the partial derivative (i.e., calculus) of the derivative security’s price with respect to a change in the underlying asset price. The delta of each security and your position’s delta are provided in the support spreadsheet in real time.
Excel Note for FTS Trader: If Excel is set to Automatic Calculate (Tools, Options, Calculations, Automatic) and you link FTS Trader to this spreadsheet, it will automatically recalculate your position delta whenever the exchange rate changes in XR1.
By trading the options and futures you can manage your position delta to be approximately zero, positive or negative. For the case of a zero position delta your position’s value will be relatively insensitive to shifts in the underlying exchange rate. If you assume a large positive position delta your position will be very sensitive to shifts in the price of the underlying (with increasing sensitivity the larger your position delta is). That is, if the underlying exchange rate increases so does your position’s value and if the underlying exchange rate decreases your position value will decline. Finally, if you assume a large negative position delta then the value of your position responds in the opposite way to the change in the exchange rate. That is, if the exchange rate increases your position’s value decreases and vice versa.
Finer points: Your position gamma is a measure of how sensitivity your position delta is to changes in the underlying. Formally, gamma is the partial derivative (in calculus) of the derivative security’s delta with respect to the underlying asset price (i.e., the second partial derivative with respect to the underlying asset price). In the field, suppose a dealer is hedging the exchange rate risk by maintaining an approximate delta neutral exposure (i.e., position delta equals 0). If a dealer maintains a gamma sensitive (i.e., large position gamma) position they must adjust delta frequently and by larger amounts to maintain a zero position delta. If a dealer maintains a gamma insensitive position (i.e., approximately zero position gamma) then this reduces the frequency and size of delta adjustments that need to be made to maintain a zero position delta. In practice by reducing the size and frequency of having to adjust your position’s delta results in a source of significant transaction cost savings.
Finally, your position Vega is a measure of how sensitive your position is to volatility.